


「日本髪の結い方」How to: Nihongami
This post is long overdue but now I am finally getting to it:
ずっと書きたかったブログ・・
How to make Nihongami – a traditional Japanese hairstyle
簡単の日本髪の結い方を紹介したいと思います。
I am by no means a professional nor do I know a lot about the traditions and different ways of tying this hair! However some people seemed to want to try this when wearing kimono, so I am sharing my insights here.
It is not the hairstyle of a Maiko or Geisha, but something more generic I suppose.
外国人より紹介するのも可笑しいですが、日本髪に興味を持ってる海外の方はいますよ。ただ、英語での説明は中々ないので、こちらから少しでも助け合えたら嬉しいと思ってます。
プロではないし、伝統的な日本髪でもないので、よろしくお願いします。
What you need:
必要なもの:

– Ketabo (毛たぼ) – a hair like mass to portion into pieces to create desired volume for this hairstyle.
The amount of volume is basically up to you, some people love massive hair and some rather decent (for every day).
– 毛たぼ – 使う量はお好みによる
毛を丸めて、しっかりの硬さになるまで揉み込む。一番大きい毛たぼは後ろ用に三角の形にするのはオススメです。右と左の為には少し小さめな毛たぼと前髪の部分(お好み)髪の毛は短い方は小さなウィッグ・付毛も必要です。
You need to shape them firmly and the biggest one should be a slight triangle shaped for the back, smaller ones for the sides, optional a small one for your bangs (and depending on the length of your hair you might need more).

Further you need:
– strong yet flexible hair wax (I use Gatsby flexible rubber in extra strong)
– a comb (which you don’t use for your normal hair or wash after because it gets sticky)
– thousands of hair pins (these are all the pins I have in my hair when doing Nihongami)
– If you have only shoulder long hair, some wig piece
– optional decoration like combs, kanzashi and kanoko (the shibori rope)
その他に必要なアイテム:
– ヘアーワックス (私は男性用のギャツビーを使ってる。Strong rubberのヤツ)
– 櫛
– ヘアーピン
– 髪の毛は短い方は付毛やウィッグ
– 髪飾り(かのこ、櫛、簪・・)

Let’s get started!
さて、スタート☆
I was able to look over the shoulder of someone getting their hair done (privately!) and am showing the steps below.
It is really not that difficult!
プライベートで友達の結い方を見ることができ、写真色々撮ってきました。
Step 1:
Part the hair in 5 portions.
Right and left until just behind the ear, the top in circular manner, the fringe portion quite far back and the middle lower back of the head.
Clip them away or tie temporally.
Tie the top part with a hair band!
髪の毛を五つの部分に分ける。
耳の後ろ、ポニテール、前髪と後ろ。クリップ又はヘアーゴムで止める。ポニテールを結ぶ。

Step 2:
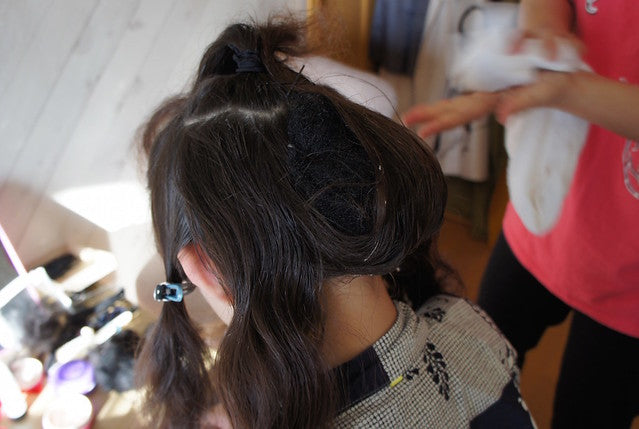
Add the big ketabo in the back like in the picture.
Pin in place with several pins until it doesn’t move.
大きい毛たぼを後ろに乗せ、いくつのピンで止める。

Step 3:
Select the middle of your back hair. Take some wax, rub it between your hands and take the streak between both hands to rub the wax onto the hair. Then comb the hair from head away in one stroke and lay it over the ketabo. Fix with hair pins.
後ろの真ん中の両面にワックスを付けて、櫛を通してから毛たぼの上に乗せる。ピンで止める。
Step 4:
Take the back sides, repeat the wax adding and combing – then lay on top of the ketabo to cover it.
後ろの右と左の部分も同じく毛たぼの上にかけて、ピンで止める。

On both sides of course. Pin in place towards the top and combine in the pony tail with an additional hair band.
後ろの毛をゴムでポニテールに含む。

Step 5:
Take the smaller ketabo and pin it in place on top of your ears until it is securely fixed.
やや小さめの毛たぼは耳の上あたりに付ける。

Step 6:
Repeat waxing and lay it on top of the ketabo while running the comb through to cover.
Pin into place securely.
Repeat on the other side as well and combine into pony tail with an additional band.
ワックス付けてから櫛を通して、毛たぼに乗せる。ポニテールに足す。


Step 7:
Take the front parted bangs, repeat wax and combing, lay on top of ketabo and secure with tiny black rubber band.
Pin in place and combine with pony tail.
前髪にももちろんワックス付けてから毛たぼに乗せて、小さなゴムで止める。ここは毛たぼなしでも大丈夫です。

Step 8:
Roll the ponytail inwards and the or pin it to last.
In this case we would tie a kanoko (shibori decoration) around the roots to cover up messy parts and else. Decorate with kanzashi and comb.
ポニテールをぐるっと巻いて、ピンやかのこか紐で止める。もっとボリュームは欲しいなら毛たぼの周りに巻く。
簪や櫛とかのこを飾って完成!

Finish.
Short hair version!
短い髪の毛バージョン☆
I have super short and fine hair (a bob cut) so it was some challenge to get mine done, but thats possible too!
The steps are same as above, except that I have short bangs and no real ponytail to offer..
So we pinned a lot and then added a pin into place wig item to mimic the big hair on the top.
When adding the kanoko, almost all the untidy pins can be hidden.
私の髪の毛は凄く細くてサラサラですし、ショートのボブカットなので、結いてくれた方は大変でした。(笑)
基本は同じですが、ポニテールや前髪は短いので、付け毛又はウィッグを付けないとボリュームでない。
そして少し「汚い」ところはかのこで隠れる。むふふ。


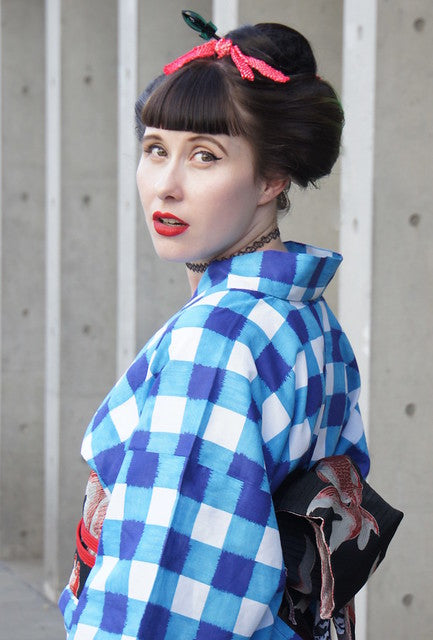
The result:
結果:


Here is a video of making the hairdo in a quick way with velcro kind of hair pieces instead of the ketabo. Although its a bit different it is easy to see and understand the parted structure and basic steps.
The padding is sold under the name “marumage kit” but would only work with thick Asian like hair, because with fine hair like mine the hair clings so much to the velcro you can’t get it out anymore. (I tried it once, please trust me.)
Also I think (although it looks good on the woman in the video) that the shape is rather odd and looks a bit weird on some people – but that depends on taste anyhow..
少し違うけど、簡単の日本髪の結い方を分かりやすくて紹介する動画を紹介したいです。
「まるまげキット」を使っているけど、毛たぼの方は自然に見えると思います。
Afterwards I tried it myself with the guide of above photos and a different hair piece (and slightly longer and green hair bits.)
始めて自分で日本髪を結いてみた時はこんな感じでした。少し髪の毛は伸びたね。

And the second time with an antique western hair comb and self made kanzashi:
二回目は結婚式に付けてたアメリカのアンティーク櫛と手作り簪で違う雰囲気ですね〜


But to be honest..
I always felt a little weird. The padding is too big, I felt like Mickey Mouse.
So yesterday I made the ketabo on the sides smaller. Also I got another wig piece because the first one was a ponytail wig and not suitable.
Lastly I tried to tie my short bangs up! Look at my forehead! I have him covered for nearly 10 years straight, this feels totally weird!! But I think with the smaller side volume and all it looks much more proper like natural Nihongami.
でも実は・・
いつも写真をみて、満足できなかった。何かが違うなぁってずっと思った。ミッキーマウスみたいに毛たぼのボリュームは大きすぎよ!
そうしたら昨日、毛たぼを小さくして、ウィッグも変えて、前髪も上げてみました!!
10年ぶりのおでこになれられない・・ヒィー
でも三回目でだいぶ良くなった気はします。自分は言うね。(笑)


I hope this will be helpful to some of you to try making Nihongami or Japanese inspired hair – as there are many variations and tastes.
少しでも助けられるなら嬉しいです。そして「ここは可笑しい!こうした方がいいよ!」と思ってる方がいたら、気楽にコメントやメール残してね♡ バカらしい間違えで歩き回るより教えて頂けると嬉しいです。
よろしく〜
Send me a picture if you try it.
Here or via social media – I’m @salztokyo on Instagram, Twitter & Facebook.
Anji xx
