


「帯締め管理」How to restore obijime tassels
I usually buy only vintage or antique obijime (kimono chord) and most of you are probably familiar with the sometimes pretty beat up tassels.
中古やアンティークの帯締めを買うとタッセルはぐちゃぐちゃのアイテムは多いですね。
私は少し怠け者でそんなに気にしないけど、「Naomi no kimono asobi」が帯締めの管理やタッセルのリメークについて分かりやすい説明を発表しました。
As a rather lazy person I tend to not care much, but the other day I stumbled upon this instruction by “Naomi no kimono asobi” about how to restore those ugly tassels.
Since its such a great tutorial, I really wanted to share it with you and Naomi gave me her blessing.
She states: “Unfortunately, more often than not with antique obijime – the tassels at the end are an absolute knotted, matted, torn mess when I receive them. Having the tassels like this can make what used to be a lovely obijime look tacky and exceptionally sloppy and unattractive when worn.”
To tackle this she created step by step instructions on how to make them look splendid again.
ナオミさんに連絡したら「シェアしていいよ」とのことで、今回「帯締めをキレイにするやり方」を紹介したいと思います。
So here we go.
Naomi no kimono asobi’s
How to restore obijime tassels
Before:

What you need:
必要なもの:

– Paper scissors (紙用ハサミ)
– Trimming scissors (トリム用ハサミ)
– Embroidery scissors (刺繍用ハサミ)
– unused boxwood comb(未使用の櫛)
– scotch tape (テープ)
– lint roller (コロコロ)
– paper tissues (acid free if possible) (ティッシュペーパー)
– iron with steam function or a water kettle (アイロンかスチーマー)
Before & after

Step 1 – Comb (ステップ1:梳る)

Make sure the teeth on the comb you use are not too fine (but also, not to wide).
Also make sure it’s clean and hasn’t been used on your hair – you don’t want to distribute all the hair dirt and oils on the end.
やや細い櫛はオススメです。そして髪の毛に使ったことない、未使用の櫛が必要です。

The goal of combing the tassels is to eventually be able to pull your comb smoothly through from bottom to ends ensuring all knots have been removed.
To do this – treat the tassel as though it is knotted hair. You DON’T want to start combing from the bottom! You’ll only make the knots worse!
絡まった髪の毛のように、根元からではなく、毛先から梳るのは大事です。

Start combing from the very ends. Make sure (like you would with human hair) that you hold onto the base securely while combing out the knots. This will help prevent you from accidentally pulling out any of the tassels.
Once you get the knots out from the very end…move down the tassel a little and continue combing. Keep repeating bit by bit until you reach the base and are able to pull the comb through the entire tassel smoothly.
ベースを掴みながら梳るのは帯締めにダメージにしないやり方です。

Already much better.
少しよくなりましたね。
Step 2 – Steam (ステップ2:スチーム)
IMPORTANT NOTE!: Do you know what material your obijime is made of? If not – I STRONGLY recommend doing a burn test before starting any sort of steaming or ironing:
https://www.threadsmagazine.com/item/31497/how-to-identify-fabrics-with-a-burn-test
Please do the burn test – that way – if your obijime turns out to be synthetic, you won’t accidentally melt it!
注意:帯締めの素材分かりますか?? 「燃やすテスト」をしてから進んだ方がオススメです。
絹だと分かる方は進んでください。
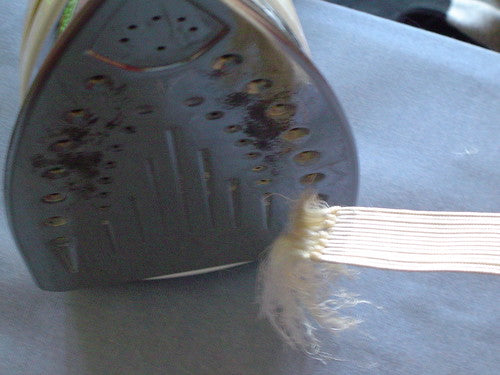
Now it is steam time! スチームタイム☆
Here – we want to start softening the threads – so burst it with steam until you can see the threads becoming more relaxed.
PLEASE USE COMMON SENSE AND SAFETY! Steam burns are nasty! So make sure you keep your hands far enough away from your iron/kettle/steamer.
糸を柔らかくするため、スチームかけます。糸は少しリラックスするような感じになるまで、スチームをかけてください。アイロンでも、スチーマーでも結構ですが、手をずいぶん気をつけて!!!
Step 3 – Comb again Steam again (ステップ3:繰り返し梳るとスチーム)

While your tassels are still warm from the steam – run your comb gently through to smooth out any knots.
Doing this while it is still warm helps straighten the threads out. Make sure you hold onto the base firmly while doing so!
まだ暖かい瞬間、ゆっくりと梳ることにします。ベースをしっかり捕まえてください。


Steam again
再度にスチーム

Using the back of the comb while the threads are still warm to smooth the silk threads and to help them set straight.
Step 4 – Iron press (ステップ4:アイロンプレッス)

BEFORE YOU START! Did you do your burn test like mentioned before??
始まる前に、絹かどうかをしっかりと確認しましたか??
My obijime is silk – so I felt comfortable enough to use the iron directly on the tassel to steam press it further. Doing this on the tassel did not damage the tassels – if anything, it seemed to rejuvenate.
However, if you are nervous about using direct heat – use a pressing cloth.
If your obijime is synthetic – you will want to use both a pressing cloth – and a much lower temperature so you don’t accidentally melt it!
絹の帯締めなら直接、又は間に薄い綿の生地をはさんで、アイロンでプレッシャーかけます。
化繊の帯締めに直接アイロンかけると溶けちゃうので、必ず低いセッティングで生地をはさんでからアイロンをかけてください。

After ironing.
Step 5 – Cutting (ステップ5:切る)

Line up your obijime evenly. Take your clippers and clip a straight line. Working bit by bit will more likely ensure a nice straight line than one big clip! Slow and steady for the best results.
帯締めをクリッパーやハサミで真っ直ぐを切ります。

Using my embroidery scissors – I did some fine trimming of the ends. You can see I’m holding onto the base firmly while pulling the tassel taunt with my fingers.
必要でしたら、小さいハサミで細い糸をカットします。

After snipping away – line them up side by side to make sure they are nice and even.
Results:

Yay! All done! So much nicer than before.
Step 6 – Wrapping (ステップ6:ラッピング)

Now, it’s time to wrap those lovely smooth tassels up to keep them in good condition!
Grab some tissue paper and place your obijime on it like so. Fold the top part down onto the tassel.
帯締めを紙かティッシュペーパーに包んで保存します。

Fold the bottom part of the paper over onto the top of the tassel and other paper fold.

I wrapped the rest of the paper around the obijime and secured with tape.
Step 7 – Folding (ステップ7:畳む)

Fold the obijime in half, then thirds. Wrap some tissue paper around the middle and secure with tape – and voila! Done! One very neatly bundled obijime!
帯締めを半分それから3回も折って、紙に包みます。

☆ FINISHED ☆
☆ 完成 ☆
Naomi also restored other types of obijime and these are the before / after results:
ナオミさんはたくさんの帯締めをキレイにしました。


At the moment Naomis page is under construction but you can give her a follow on Facebook and her homepage later, once its live again.
ナオミさんをぜひフォローしてください:
Facebook: https://www.facebook.com/NaomiKimonoAsobi/
Homepage: https://www.kimonoasobi.com/ (currently down)
