


「スペースインベーダー着物の作り方」How to: Space Invader Kimono
For a while now I really wanted a half-half coloured kimono (aka. 片身替り katamigawari).
Unfortunately they are very hard to find and if you come across one, they are usually pretty expensive.
前から片身替り着物(半々の色)が欲しかったけど、手に入りにくいことが分かりました。
もし見つかったとしても、高いお値段で売られています。
Being as poor as I am right now my only chance was to make something myself. However making a kimono from scratch seems kinda scary – so I thought to myself: What could be the easiest way to make such kimono? Right!
Cut two kimono in half and sew the different ones together! Sounds like a plan!
お金がない人(私)だと、自分でやるしかないです。(笑)
ただ、お着物を縫うのはとても難しそうですので「何か簡単の方法はないのかなぁ」と考え・・ そう!
二つの着物を半分に切って、縫いつけたらいけるかもとのアイデアがありました。
The first challenge:
Find two kimono with the same / similar sizes.
チャレンジONE: 寸法の同じ着物を二つ見つける
☆ POINT 1:
There are many factors as wingspan, sleeve length, front and back panel width and overall length to look at, otherwise the kimono will look totally weird when sewn.
パッと見たら簡単そうですが、細かい寸法は色々ありますよ。身丈、裄、袖丈、前幅と後ろ幅など。
寸法が違うと変な形になっちゃいますね。
☆ POINT 2:
Get a hitoe kimono (single layer / without lining) because it is much easier to access the seams.
簡単に半分に分けるため、単衣着物を選ぶ。袷だと大変です。
It took me some time but I managed to find two summer kimono made of silk who had the same sizes apart from the length.
少し時間はかかりましたが、寸法はほぼ同じの絹でできた絽の夏着物が見つかりました。身丈だけは違いましたけど、そこは直しやすい。


How to: Two-colour DIY Kimono
片身替り着物の作り方
☆ Step 1:
Open the seam in the middle of the back by cutting the stitches open and pulling the threads out.
背中の縫い目を切って開く。

☆ Step 2:
(Depending on your liking!! – I wanted to have the collar halfed as well, but some people prefer to keep the collar in one piece and in one designated colour. In that case you would need to disassemble the collar. I wanted it cut.)
Carefully cut the collar in half.
(私は襟も半々カラーにしたかったのでそうしましたが、襟を切りたくない人も多いと思います。その場合は襟を取らないといけないですね。これはお好みによります。)
背中の縫い目に合わせて襟を半分に切る。


☆ Step 3:
Swap one half with the other kimono’s half and align along the middle seam.
半分になった着物同士を背中の縫い目で合わせる。


☆ Step 4:
Pin the collar together along the cut line (only outer layer! Not the white lining etc.) and sew straight together by machine.
襟の外側の生地を合わせ、ピンで止め、ミシンで縫う。
Result from outside:
結果:

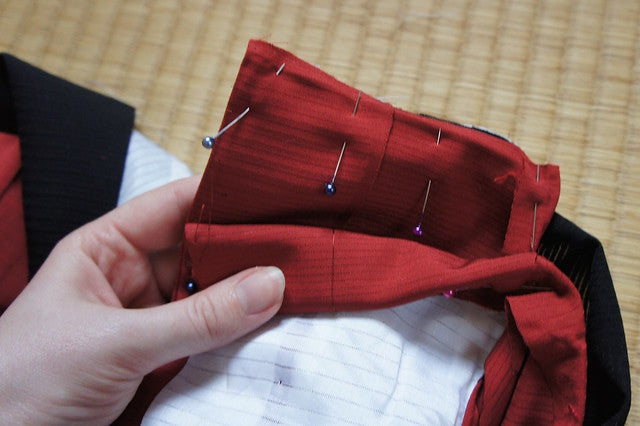
☆ Step 5:
Now align the rest of the kimono’s mid seam carefully! and pin together. Then sew all the way down.
そして背中の縫い目のラインに気をつけながら合わせてピンで止める。襟からすべてを真っ直ぐに縫う。


Result:
結果:

☆ Step 6:
(Not necessary if you have exactly same sized kimono.)
Since one of my kimono was longer than the other I had to cut it shorter, fold it twice, iron to keep the shape and hand stitch with invisible stitches.
(身丈は同じの着物でしたら必要ありません。)
長さは違う場合は、少し切って、二回折って、アイロンかけてから手縫いする。できるだけ外側に糸が見えないように縫いつけてください。


Result:
結果:

☆ Step 7:
Lastly I fixed the inner layer of the collar by sewing it with hand. Then folded in half and attached the collar in the middle because it holds all better in place when wearing and I was too lazy to attach buttons again to fold/unfold.
最後に襟の中の布を手縫いし、半分に折って真ん中にも縫い付ける。(またお好みによります。)


FINISHED!
完成!!

You see the family crests have different height but we will fix this later.
残念ながら家紋の位置は合ってなかったので、後で隠します。(笑)
Now I had a katami-gawari kimono in red and black. That’s already pretty cool, but me being well, me – I thought it was too toned down and boring. Something missing.
So I bought myself acrylic gouache to hand paint this kimono.
やっと片身替り着物が完成です。とても素敵ですが、何かが足りない気がしてました。
手書きのデザインをつけることを思いつき、絵の具を買いました。
And I wanted to make myself a unique pattern! Something fun nobody has.
A SPACE INVADER KIMONO!!!
Super excited about this idea I wanted to make myself stencils so I can easily paint the repeating designs, but I feared that with paint I could’t nicely show the edgy pixels of this retro game.
ユニークな着物が欲しくて色々デザインで悩んでいたところ・・
スペースインベーダーの着物があればすごい!!!とのアイデアが浮かびました!
はっきりしてるピクセルの宇宙人を筆とペイントでかけば綺麗にできないと思って、プランチェンジ〜
Being a T-Shirt designer with some experience and stock I figured a heat transfer foil would do the job best. So I designed / arranged the designs on my PC in Illustrator and printed them on the heat transfer paper in the size needed.
Tシャツのデザインもしているので少しノウハウと経験もあり、パソコンでインベーダーのデザインを編集し、熱転写の紙にプリントしました。
Kimono printing process:
着物にデザイン付ける方法:
☆ Step 1:
Design on your computer and print it on heat transfer foil (I used one from Germany which is meant for T-shirts).
パソコンでデザインしてから、熱転写の紙に印刷する。(私はドイツから輸入した紙を使いました)

☆ Step 2:
Cut out the designs. (I decided to keep each strip attached so they would stay perfectly in line.)
デザインの形に合わせて切る。(インベーダーを綺麗に並べるためにつなげたままにした。)

☆ Step 3:
Plan and position how the design should look on your kimono later.
Keep in mind how it is going to look when the kimono is worn. I wore it a couple of times in front of the mirror to determine the best locations.
位置を決める。着物を一度軽く着ながらデザインの位置を決めるのはおすすめです。

☆ Step 4:
(Also depends on the instructions of the heat transfer foil!)
Peel off one layer, place design, cover with iron sheet and iron on with pressure.
(商品の使い方によります。)
紙をとって、アイロンシートでカバーしてから押しながらアイロンをかける。

Note:
I also made space invaders family crests to cover the old ones and a big one in the back to cover up the different crests.
インベーダーの家紋も作り、着物の家紋の上に貼りました。後ろのズレた家紋の上に大きいインベーダーをつけました。
FINISHED!!!
完成です☆
The result (including self-made tabi and obidome) looks like this:
スペースインベーダー着物コーデはこちら:
(足袋と帯留めも手作りです。)


Thanks for reading!
And let me see if you make or embellish a fun kimono yourself!
ここまで読んで頂いてありがとうございます。
オリジナルの着物を作ったらぜひ教えてね!このブログで紹介するかも♡
Anji
PS: Also check out my new Summer Shirt Design Collection here:
新作のTシャツも是非ご覧ください:
